AWS accounts (cloud discovery)
~10 minutes. You create one read-only IAM role in your own AWS account and
give AuthSec its address. AuthSec never receives an access key -- only
short-lived credentials from an sts:AssumeRole call that your own trust
policy gates. The role is explicitly denied Secrets Manager, SSM Parameter
Store and KMS decryption, and cannot assume anything further. No secret value
is ever stored -- see What the role can and cannot
read.
Five things, all read-only: IAM identities (roles and users) and their attached and inline policies; access keys and when each was last used; the workloads that run as those identities -- Lambda functions, ECS task definitions, EC2 instances; AI agent surfaces -- Bedrock agents, AgentCore runtimes and their credential providers; and the EKS identity edge, meaning which IAM role a Kubernetes service account is allowed to use.
Not collected yet: IAM groups. Permissions a user holds through a group are not read, so a user whose access comes entirely from group membership will appear to have fewer permissions than they really do. Policies attached directly to the user or role are collected in full. Plan reviews around that until group support lands.
Liveness comes from IAM's service-last-accessed reports -- per identity, per service, with AWS's own tracking period -- so an identity that holds permissions it has never exercised stands out. CloudTrail is read separately and only as recent evidence: a fixed 48-hour window per region, which shows individual API calls rather than establishing whether an identity is dormant.
How it works
AuthSec does not ask for a long session. It requests no explicit duration, so
the AWS SDK's default of 15 minutes applies, and credentials are renewed
as a scan needs them. MaxSessionDurationSeconds on the role is the ceiling
your account permits, not the length AuthSec asks for.
Three terms, in plain English, before the steps:
- An IAM role is a bundle of permissions that something can borrow temporarily. Unlike an IAM user it has no password and no access key, so there is nothing to leak or rotate.
- A trust policy is the rule attached to that role saying who is allowed to borrow it. Yours will name exactly one AuthSec identity.
- An ExternalId is an identifier AuthSec generates for your connection and you write into that trust policy. AWS then refuses any borrow request that does not present the matching value. AWS is explicit that this is not a secret -- it is a value you cannot choose, which is the property that matters here.
The ExternalId exists to close a real gap called the confused deputy
problem. Note first what it is not protecting against: a random third
party cannot assume your role no matter what, because the trust policy's
Principal already restricts that to AuthSec alone.
The actual risk is that AuthSec becomes the confused deputy. Role ARNs are not secret -- they turn up in logs, error messages and support tickets. So another AuthSec customer could paste your role ARN into their AuthSec workspace, and ask AuthSec, which is permitted to assume it, to do so on their behalf. The ExternalId stops that: AuthSec issues one per connection and no customer can choose it, so the value in your trust policy only ever matches the connection you started. See Confused deputy for the general pattern.
So a working connection is two halves that must agree: the ExternalId in your trust policy, and the role ARN you hand back to AuthSec. Nearly every failure in Troubleshooting is those two disagreeing.
Prerequisites
- An AWS account, and access to its Console
- Permission to run CloudFormation and to create the role it defines --
in practice
cloudformation:CreateStackplusiam:CreateRole,iam:AttachRolePolicy,iam:PutRolePolicyandiam:TagRole - An AuthSec workspace where you can add integrations
The role itself is free. Nothing is installed in your account, and nothing is ever written or changed by AuthSec.
A service control policy (SCP) at the organization or OU level can deny IAM
role creation even when your own permissions allow it. The stack then fails
with an explicit AccessDenied naming the SCP. That is not something you can
fix inside the account -- your organization's administrator has to permit it.
Step 1 -- Start the connection in AuthSec
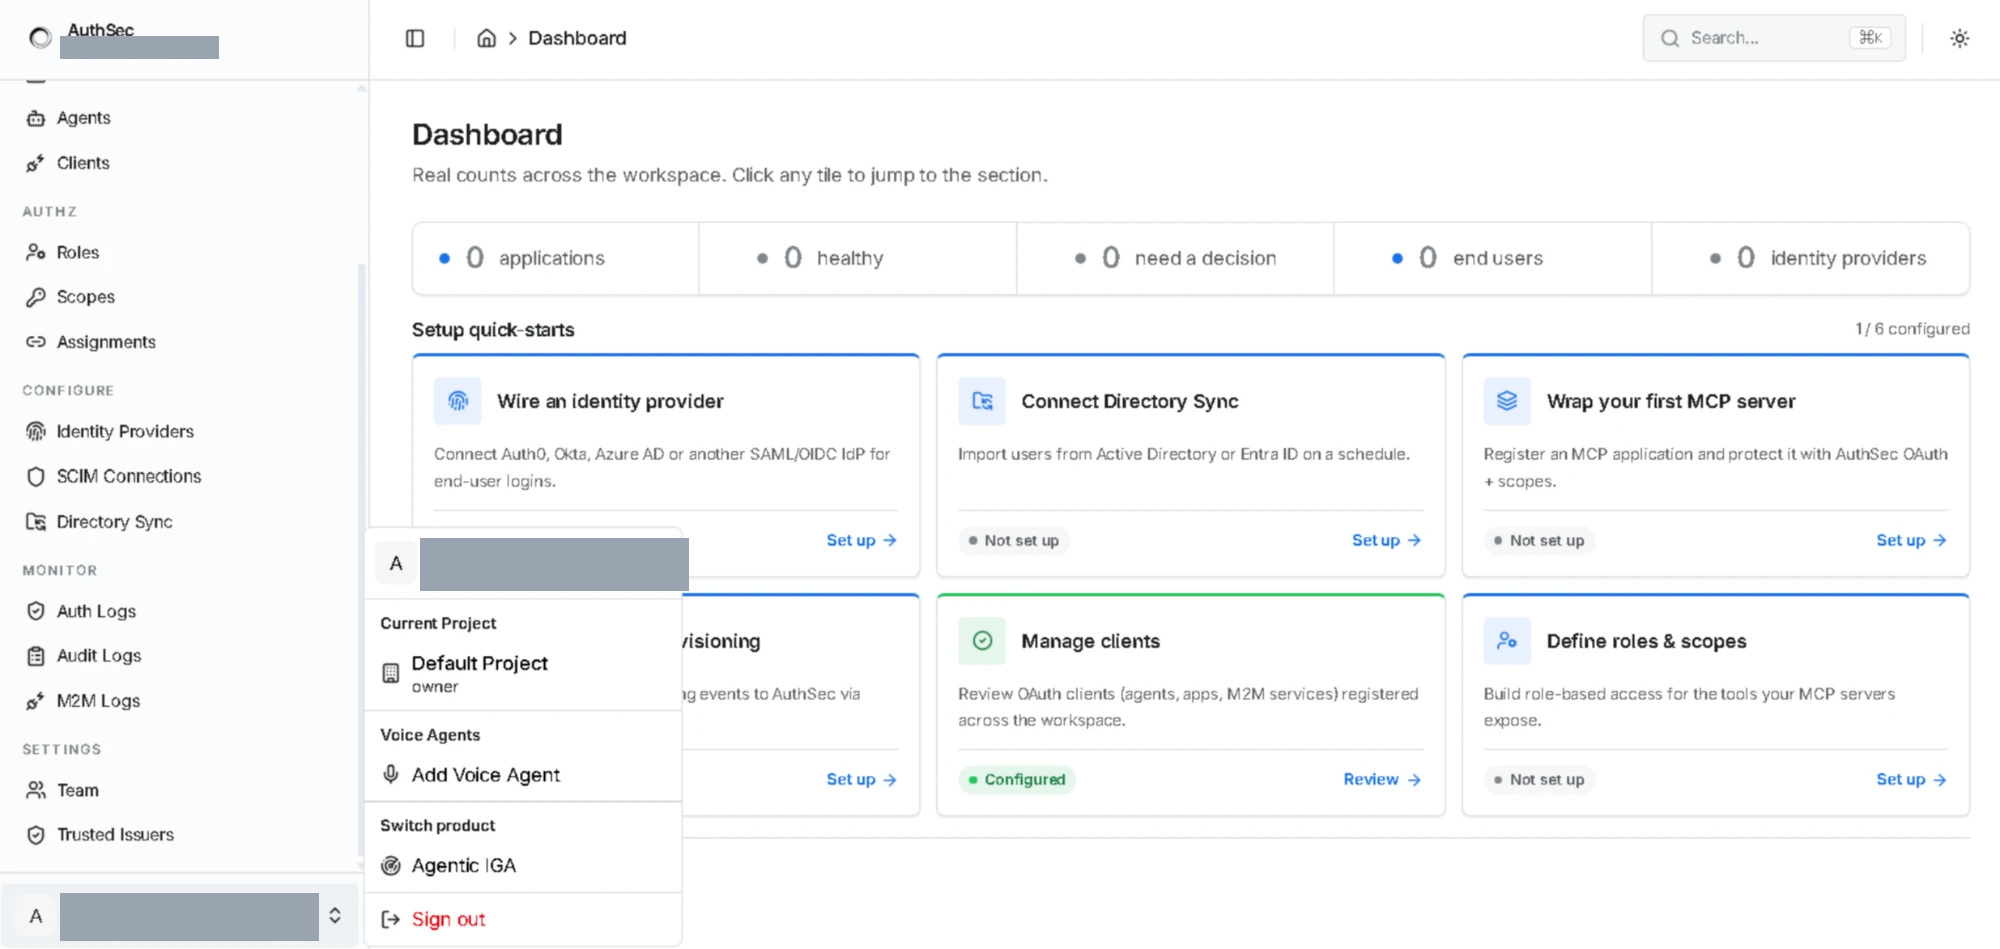
Cloud discovery lives in the Agentic IGA product. If you are in the main AuthSec console, use the account menu at the bottom of the sidebar -> Switch product -> Agentic IGA:
Then DISCOVERY -> Integrations -> Add integration. Choose AWS and click Continue:
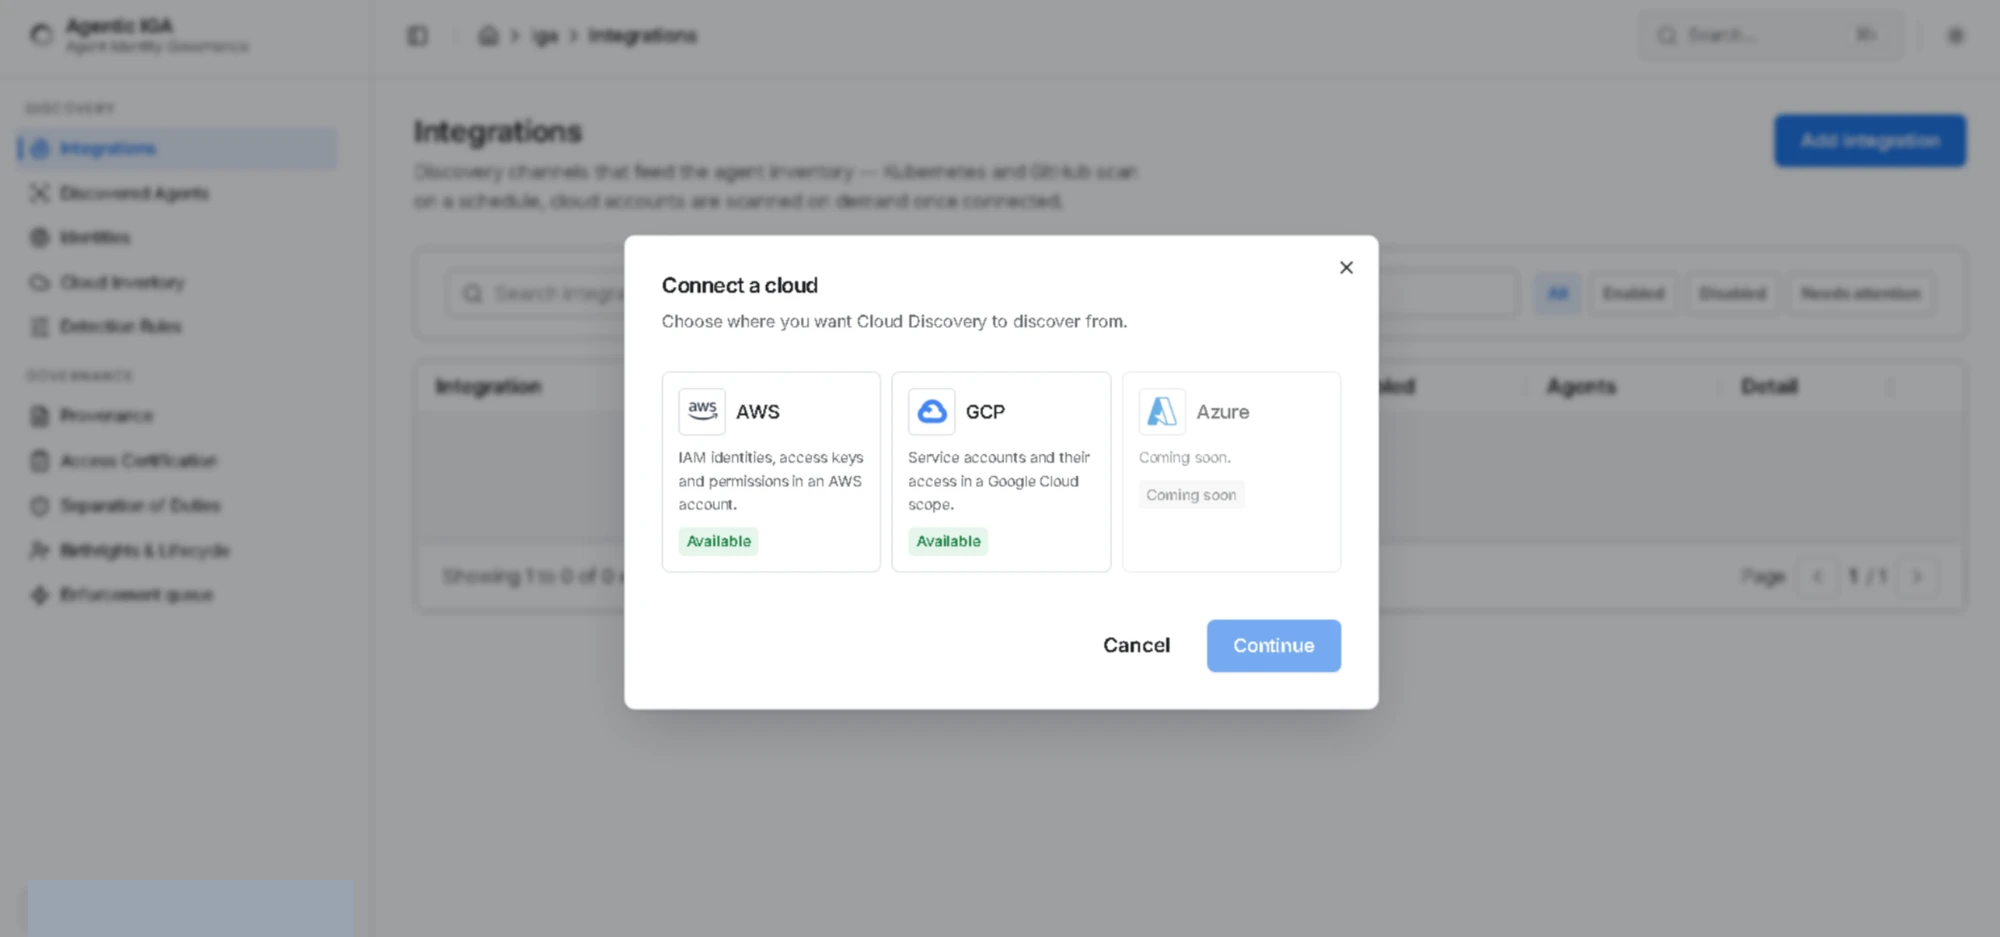
The wizard has three pages -- Review & connect, Confirm the role and Connected. To avoid confusion with this guide's numbered steps, they are referred to by name throughout.
Review & connect shows you the two values to carry into AWS:
- AuthSec principal -- the IAM identity, inside AuthSec's own AWS account, that will be allowed to assume your role
- ExternalId -- the identifier generated for this one connection attempt
It also offers Download CloudFormation template. Download it now.
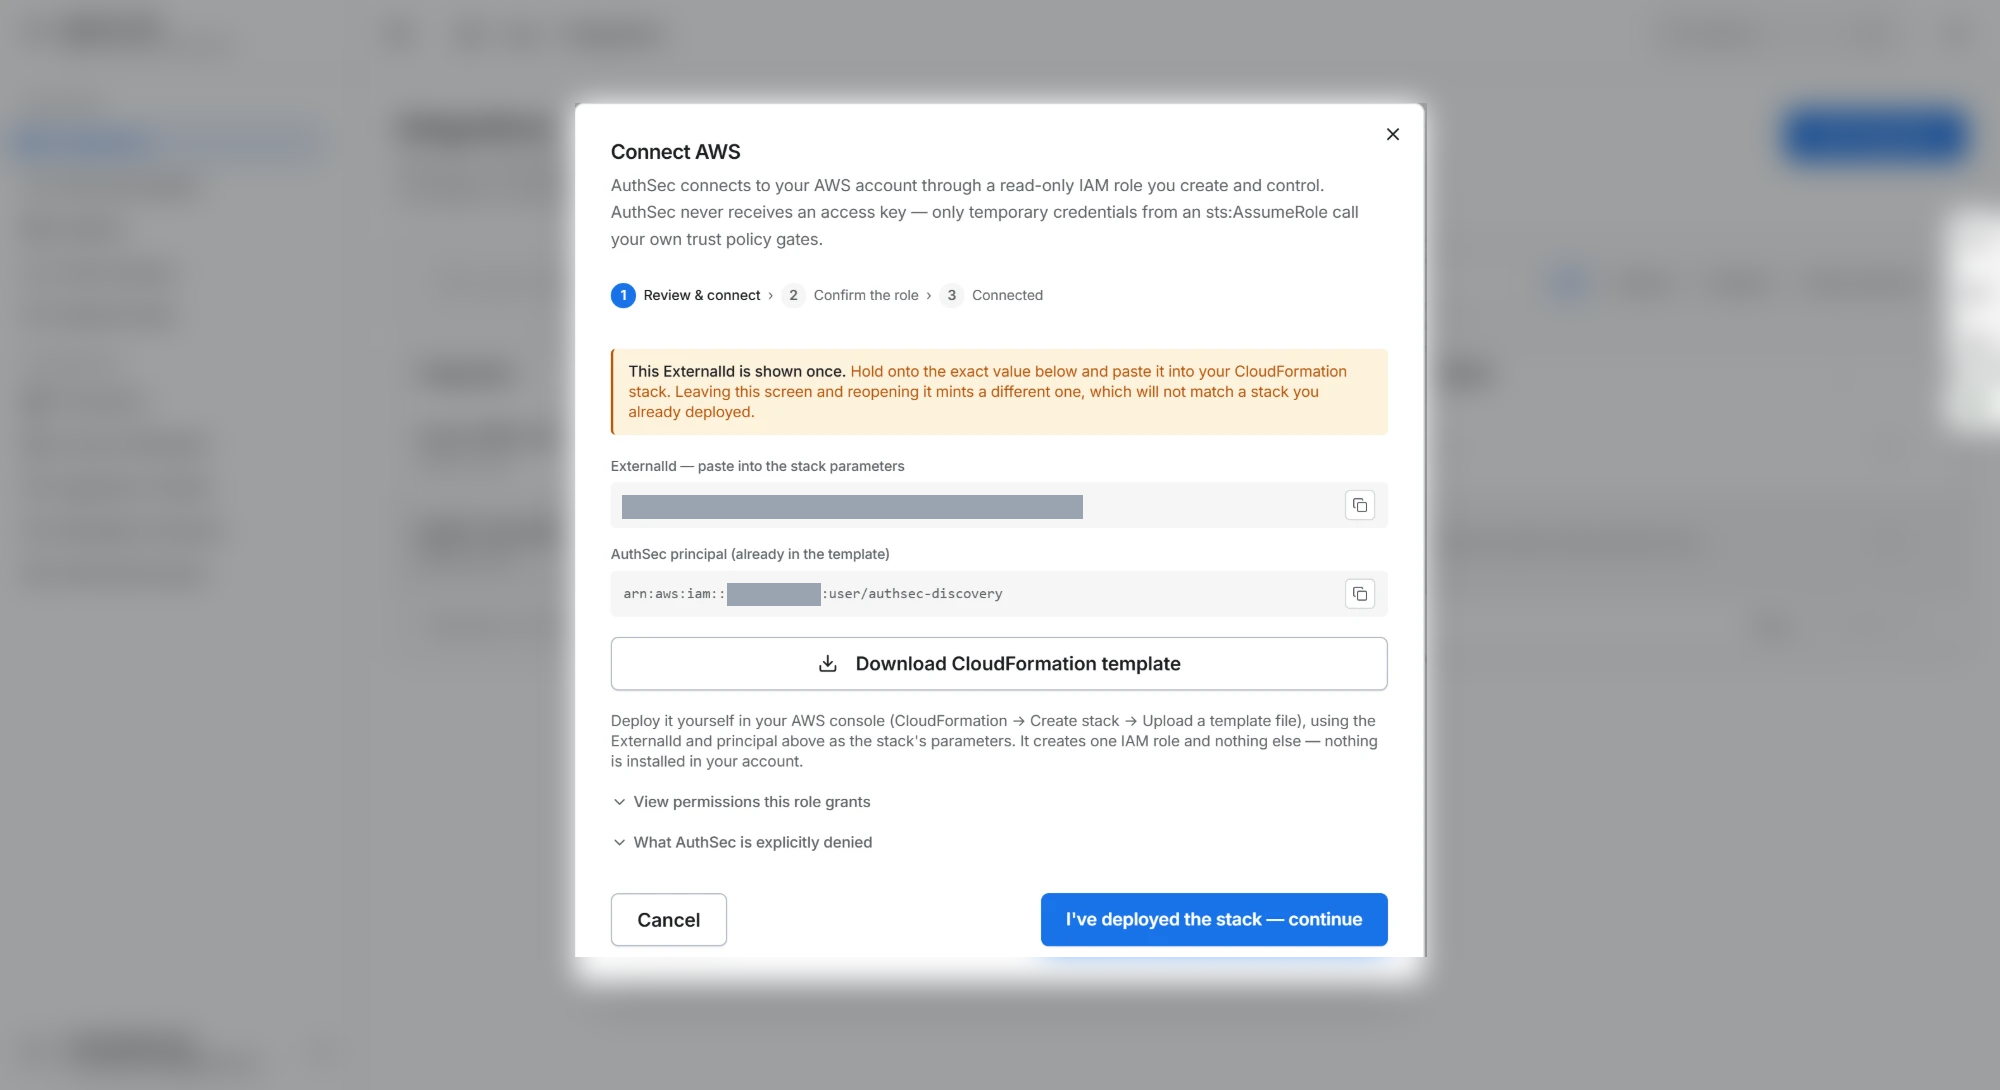
Two expandable sections on this page are worth opening before you deploy anything: View permissions this role grants and What AuthSec is explicitly denied. They list the same actions the template contains, so you can check them without reading the YAML -- and they are the quickest answer to a security reviewer asking what this role can do.
The ExternalId is generated per attempt. Close the wizard and start Add integration again and you get a different ExternalId -- which will no longer match a stack you already deployed with the old one. Keep this tab open until you have finished Confirm the role.
Step 2 -- Deploy the template in AWS
A CloudFormation template is a text file describing AWS resources you want to exist. You hand it to AWS, AWS creates everything in it, and the resulting bundle is called a stack. Deleting the stack deletes what it created, which is what makes this easy to undo.
What the template actually contains
It creates exactly one resource -- the role:
Resources:
  AuthSecDiscoveryRole:
    Type: AWS::IAM::Role
    Properties:
      RoleName: !Ref RoleName
      MaxSessionDuration: !Ref MaxSessionDurationSeconds
!Ref RoleName means "use whatever the operator typed into the RoleName
parameter" -- that is how CloudFormation substitutes your input.
The trust policy is the half that enforces the ExternalId:
AssumeRolePolicyDocument:
  Statement:
    - Effect: Allow
      Principal:
        AWS: !Ref AuthSecPrincipalArn
      Action: sts:AssumeRole
      Condition:
        StringEquals:
          sts:ExternalId: !Ref ExternalId
Principal-- only that one AuthSec identity may even attempt the callAction-- the only thing permitted is becoming this roleCondition-- and only when the matching ExternalId is presented
Permissions come from SecurityAudit, an AWS-managed read-only policy built
for auditing tools, plus a short list of List / Describe / Get actions
for services it does not cover (Bedrock, AgentCore, EKS pod identity,
CloudTrail lookups, and bucket/key policy documents).
Finally, three explicit denies:
- Sid: NeverReadSecretValues   # secretsmanager:GetSecretValue, ssm:GetParameter, ...
  Effect: Deny
- Sid: NeverDecrypt            # kms:Decrypt, kms:GenerateDataKey, ...
  Effect: Deny
- Sid: NeverChainRoles         # sts:AssumeRole*
  Effect: Deny
In IAM an explicit Deny always beats any Allow. None of these are granted
in the first place, so they change nothing today -- they exist so the
guarantee survives the future. NeverChainRoles is the subtle one: it makes
the discovery session a dead end, so the role can never pivot deeper into
your account.
What the role can and cannot read
Worth being precise, because "read-only" and "never sees secrets" are not the same statement.
Enforced by IAM. Secrets Manager values, SSM Parameter Store values and KMS decryption are denied outright. No code path can reach them, and no change to AuthSec could reach them without you updating the stack.
Enforced by AuthSec's code, not by IAM. One case: lambda:ListFunctions
returns each function's environment variable values along with its
configuration, and AWS offers no action that returns the names alone. AuthSec
keeps only the variable names and discards the values as it parses the
response -- there is no database column a value could be written to. This is
a code guarantee rather than a permission boundary, and it is worth knowing
the difference when you review the role.
Not read at all. ECS container definitions are never inspected -- only a
task definition's ARN, family, task role, execution role and status. EC2 user
data, which can contain credentials, requires ec2:DescribeInstanceAttribute;
AuthSec never calls it.
Create the stack
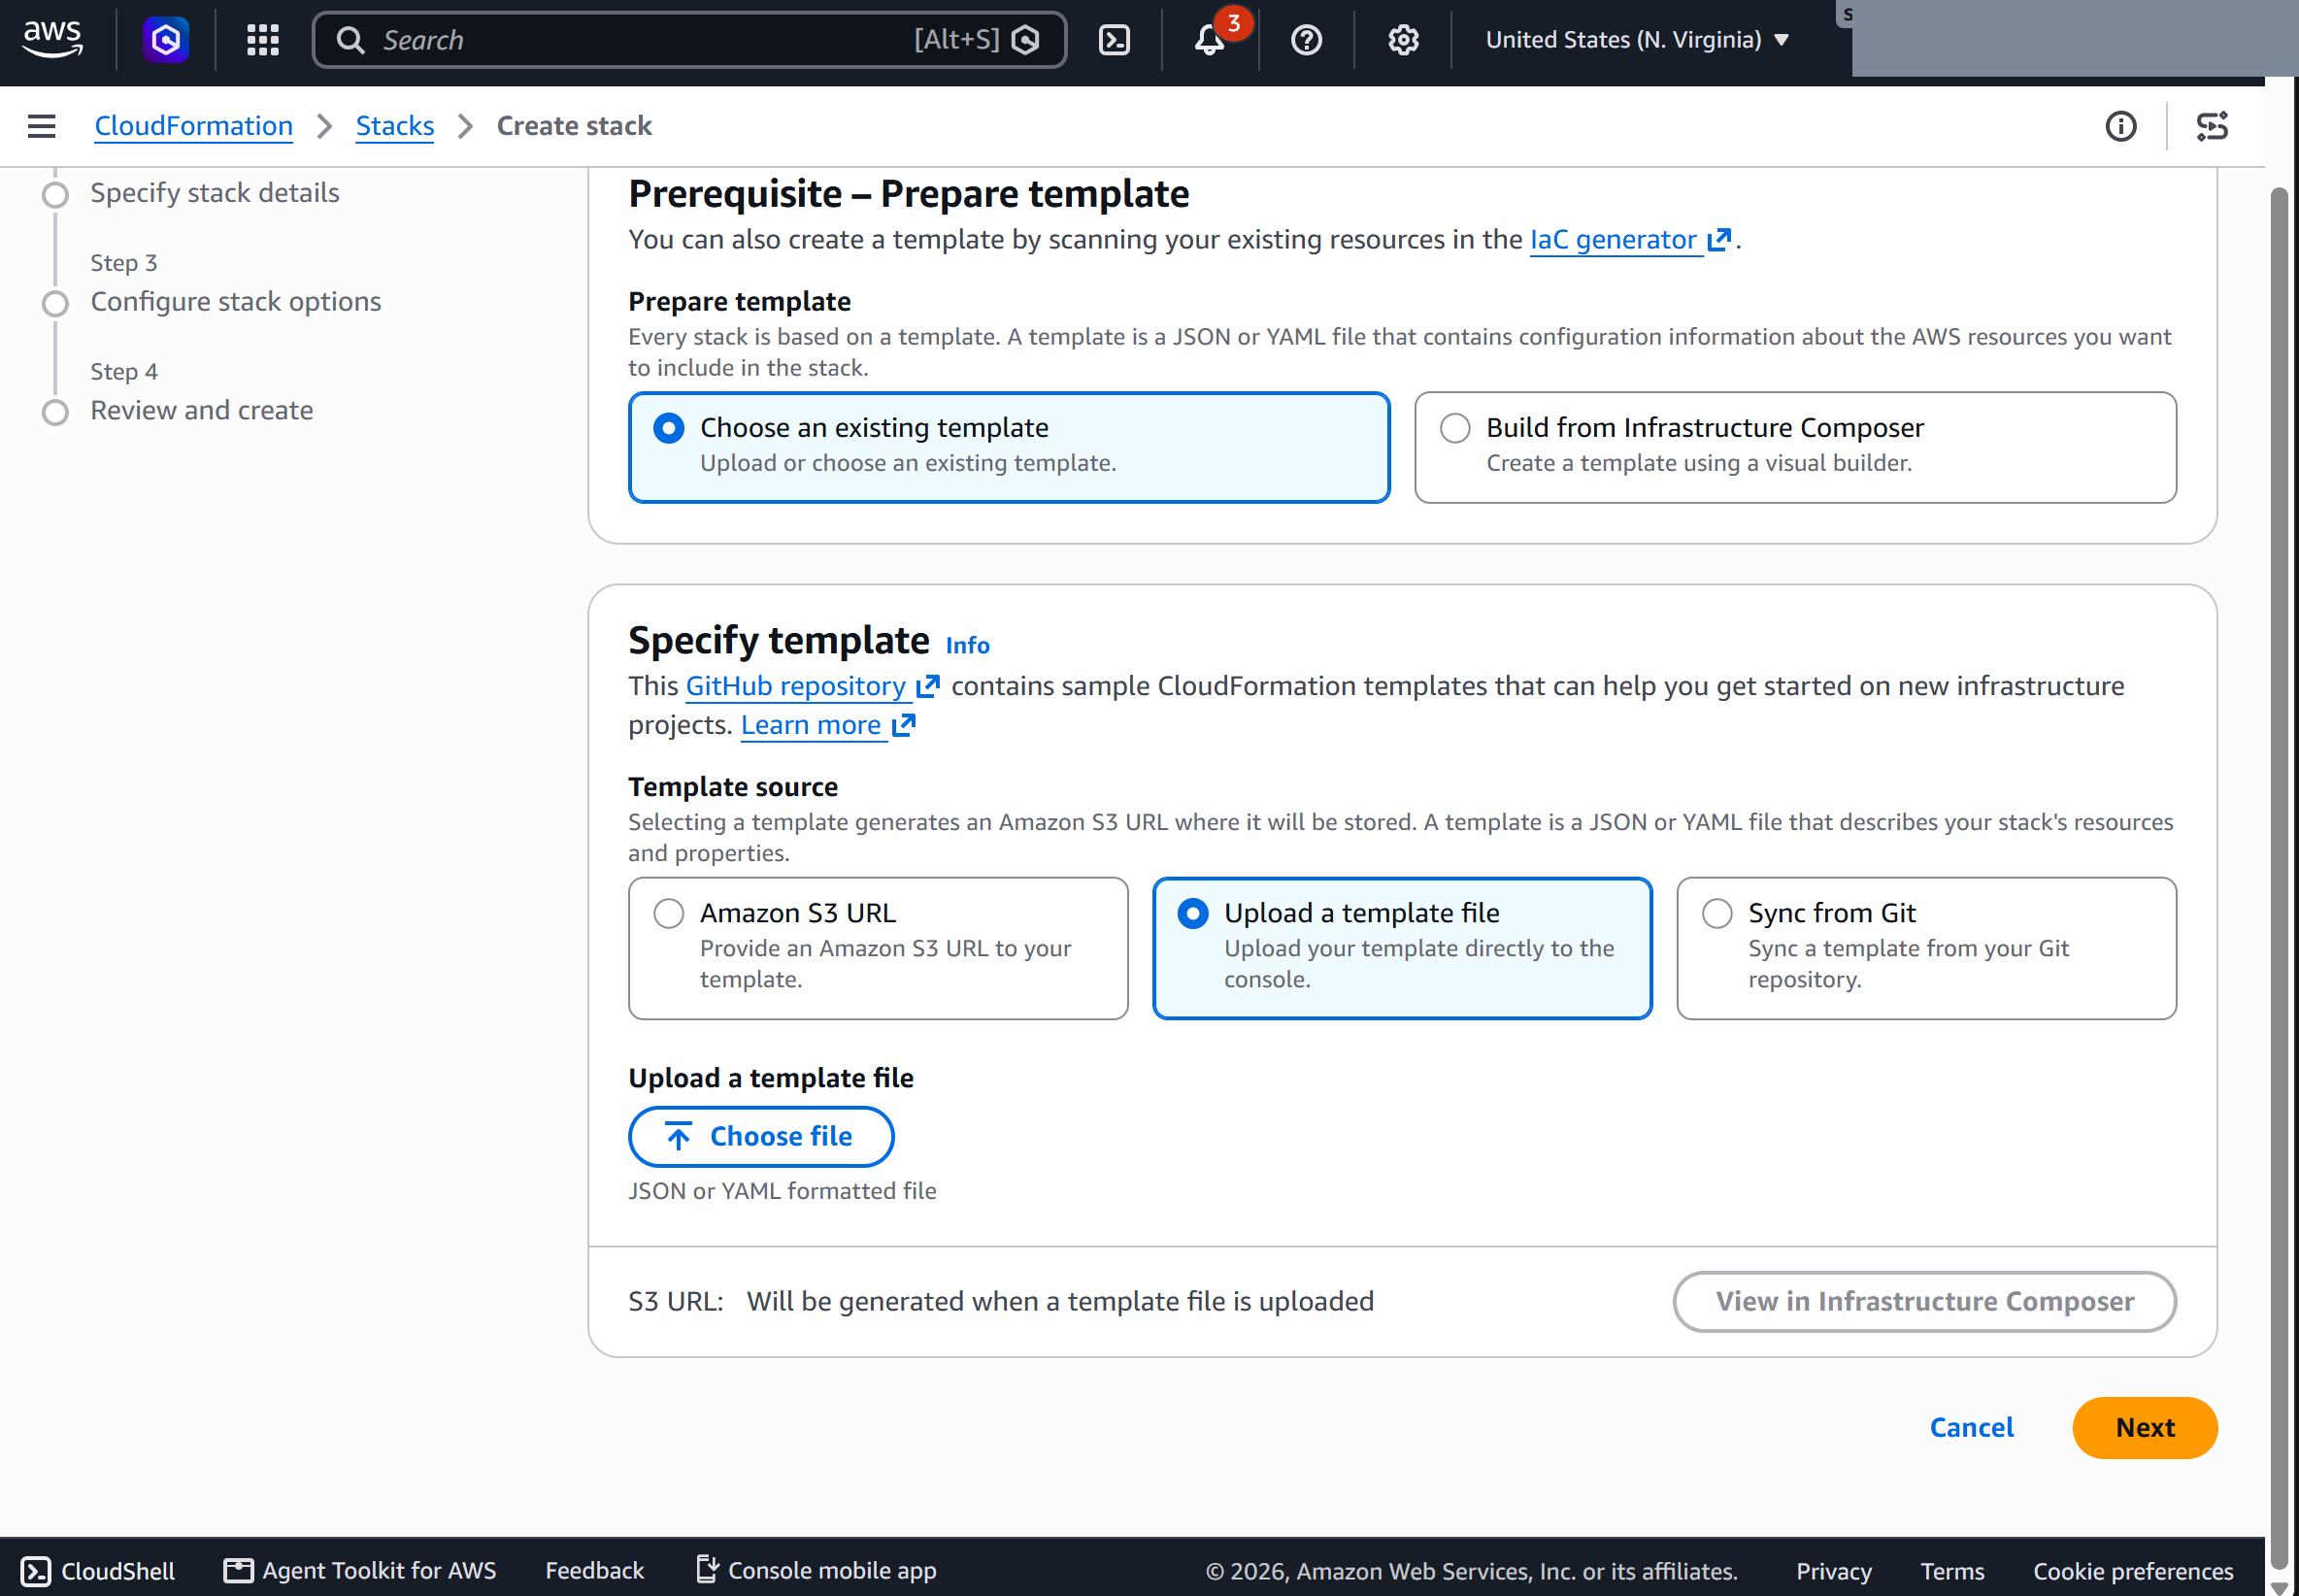
In the AWS Console go to CloudFormation -> Stacks -> Create stack -> With new resources (standard):

On the first page leave Choose an existing template selected, pick
Upload a template file, click Choose file, select the .yaml you
downloaded, and click Next:
Give the stack a name -- authsec-discovery-role is a good one -- then fill
in the parameters:
| Parameter | What to enter |
|---|---|
AuthSecPrincipalArn | The AuthSec principal ARN from Review & connect, copied exactly |
ExternalId | The ExternalId from Review & connect -- case-sensitive |
RoleName | Leave as AuthSecCloudDiscovery unless your naming convention differs |
MaxSessionDurationSeconds | Leave at 3600. This is the longest session the role permits; AuthSec asks for far less |
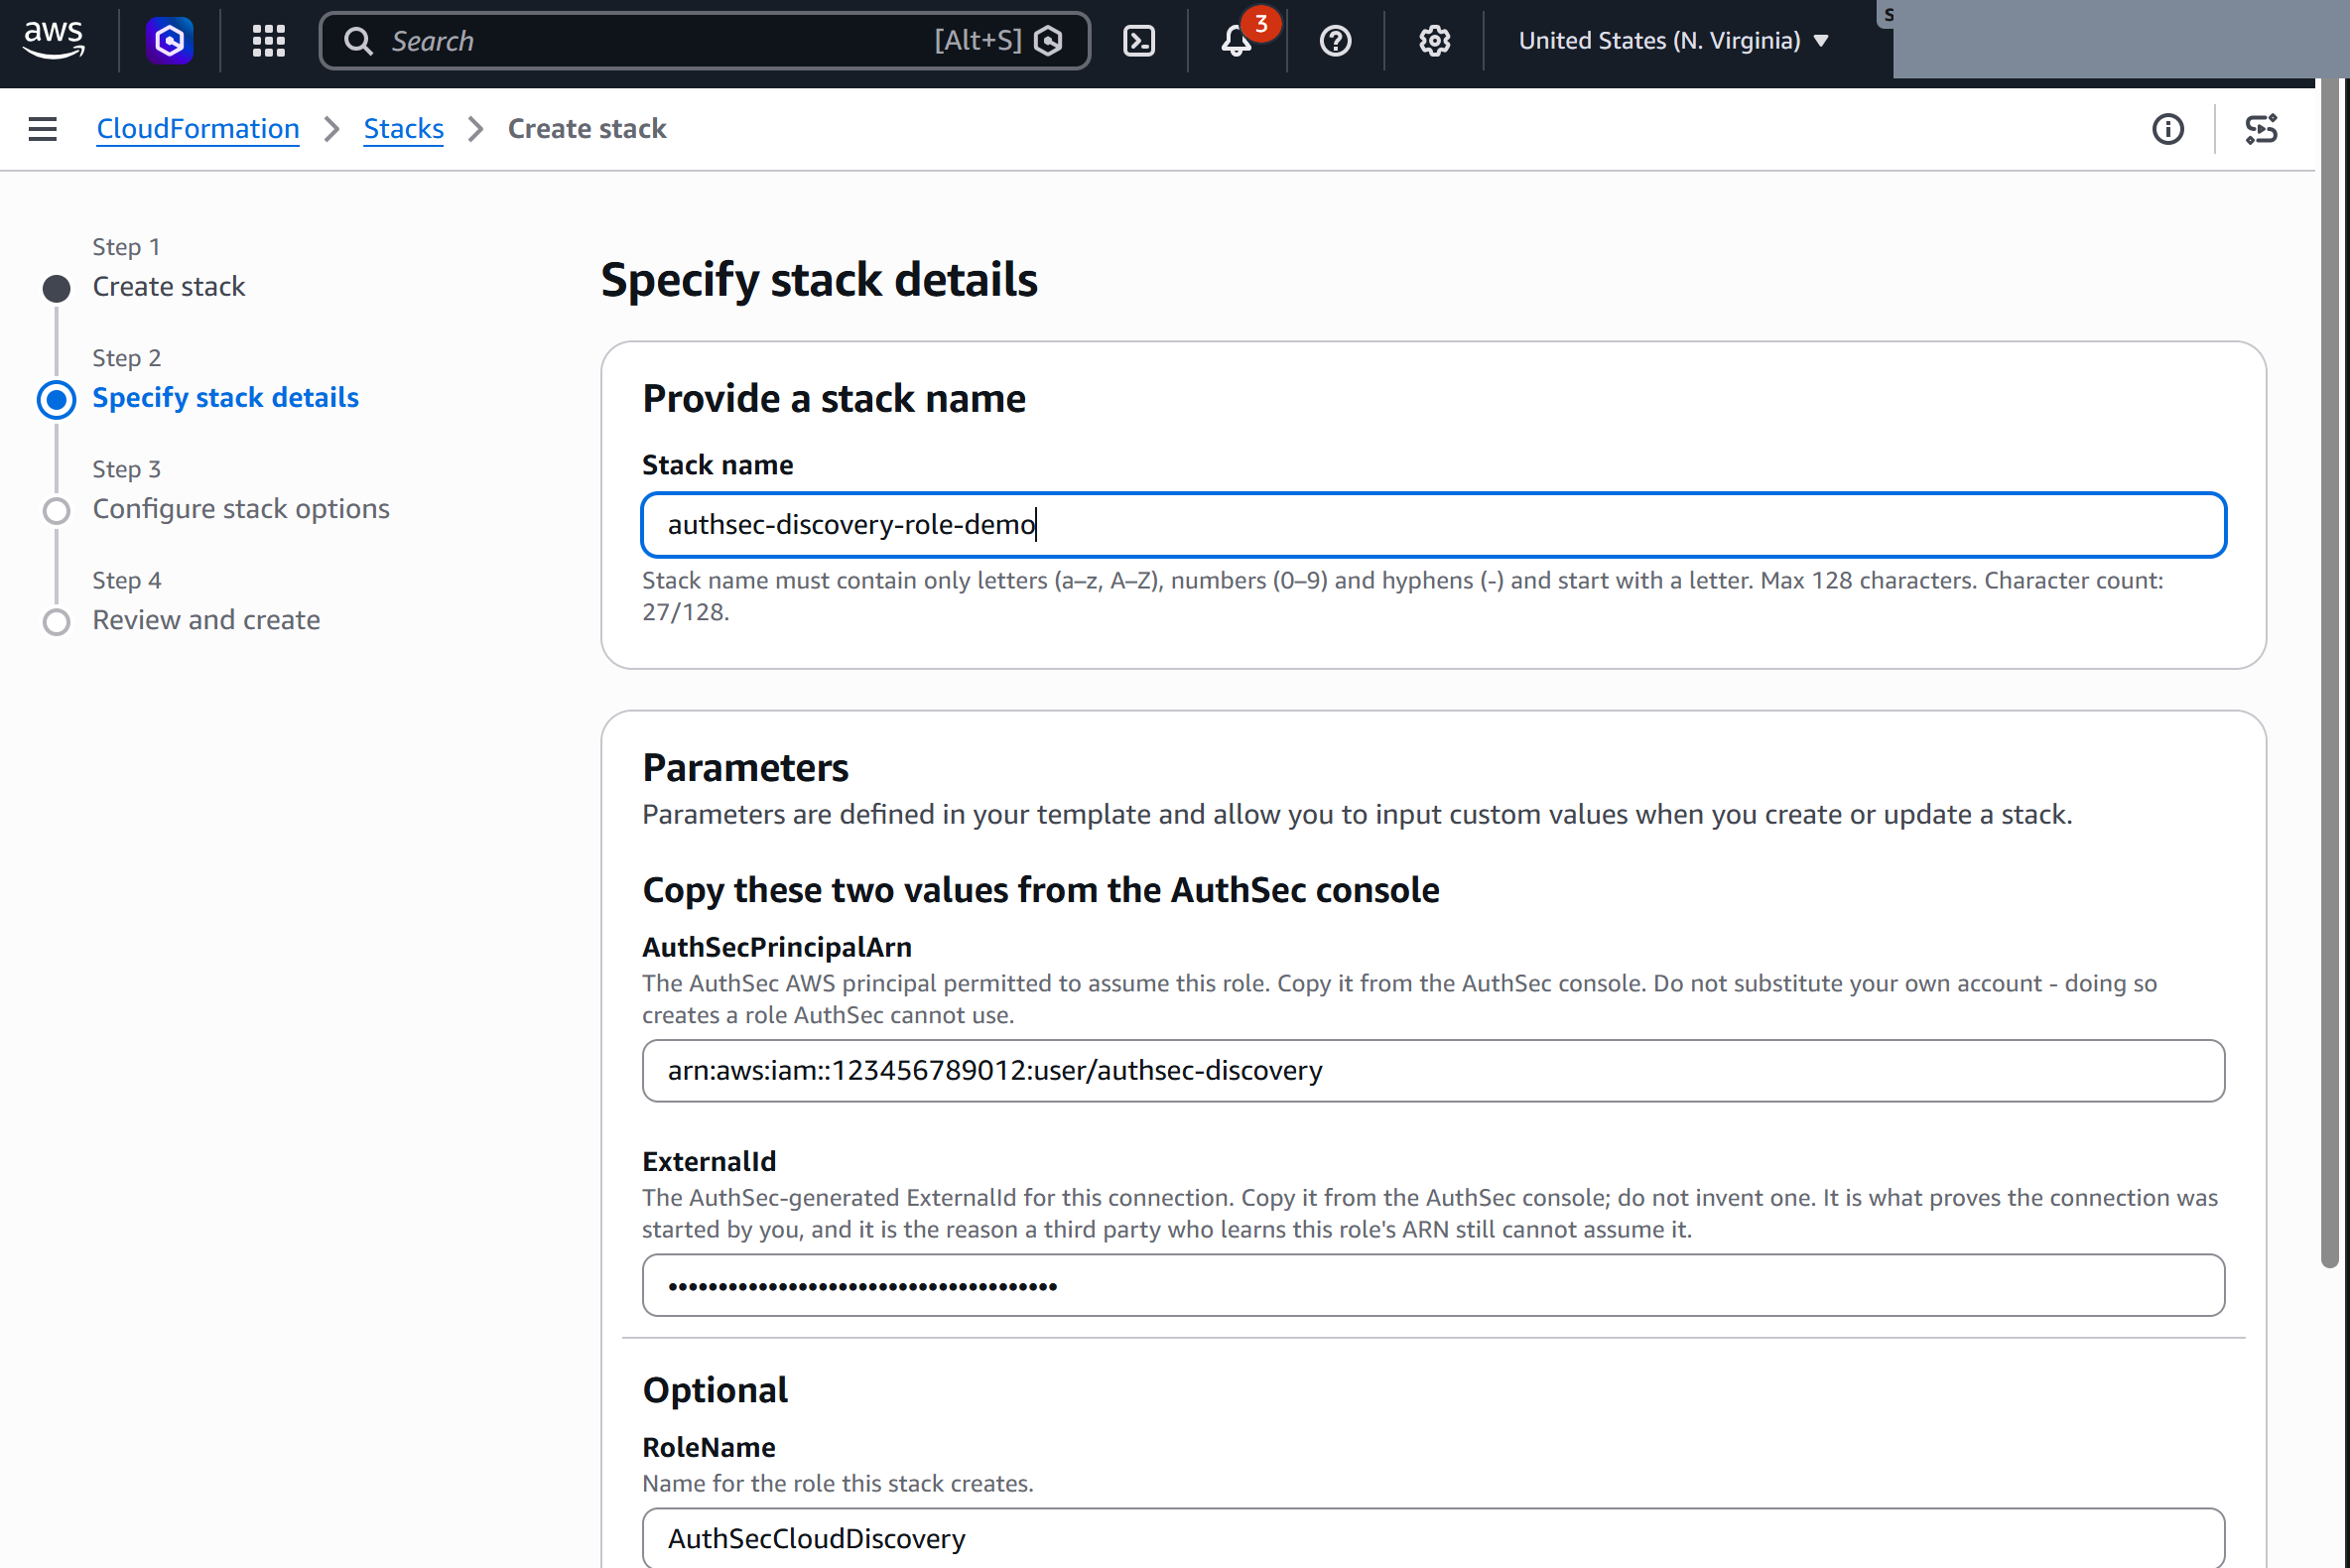
Two things the template does here to catch typos: the principal ARN is
pattern-checked, so a malformed paste is refused instead of producing a
role AuthSec cannot use; and MaxSessionDurationSeconds has a floor of
3600, which is AWS's own minimum for a role.
The ExternalId field is marked NoEcho, which hides it in the CloudFormation
console and in stack events. That is not the same as hiding it: once the role
exists, the value is plainly readable in IAM -> Roles -> your role -> Trust
relationships, because it is part of the trust policy document. Treat it as
an identifier you cannot choose, not as a credential to protect.
On Configure stack options leave everything as it is, but do not skip the bottom of the page. Under Capabilities, tick the acknowledgement:
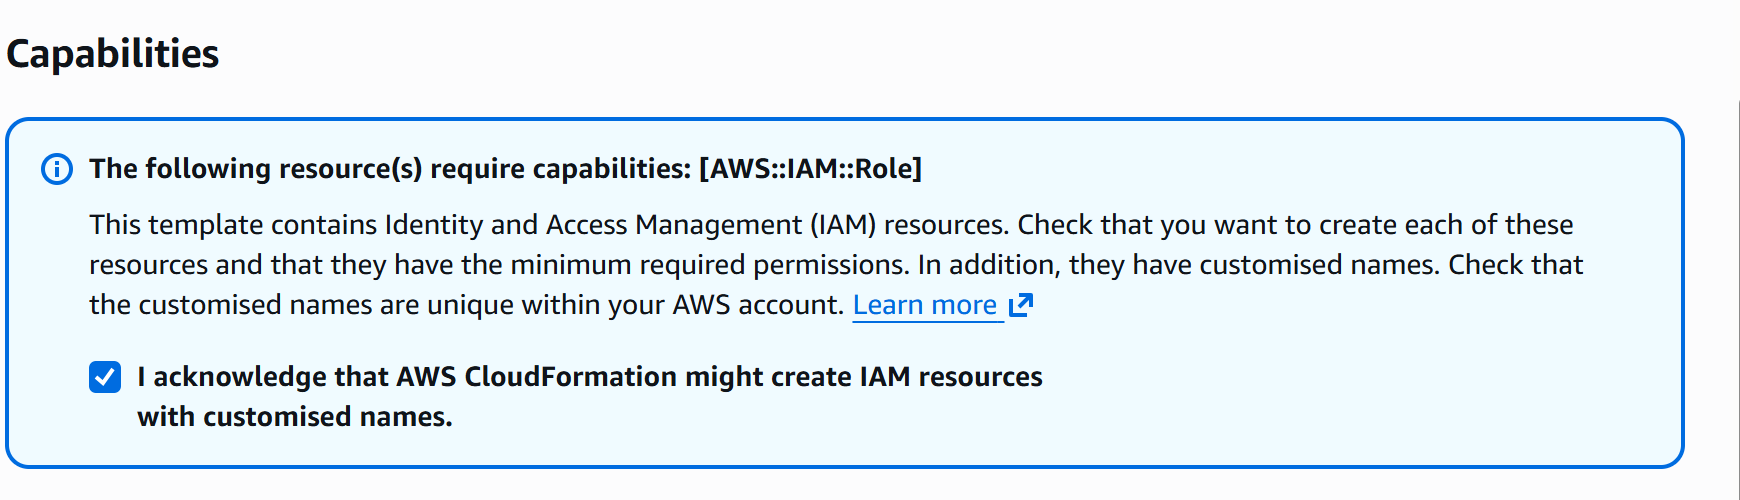
AWS requires an explicit acknowledgement whenever a template changes IAM
permissions, so that creating identities is never something a stack does
quietly. Because this template gives the role a fixed name rather than
letting CloudFormation generate one, it needs the stronger of the two
acknowledgements, CAPABILITY_NAMED_IAM. Here that is expected -- the named
role is AuthSecCloudDiscovery, which is what you paste back into AuthSec.
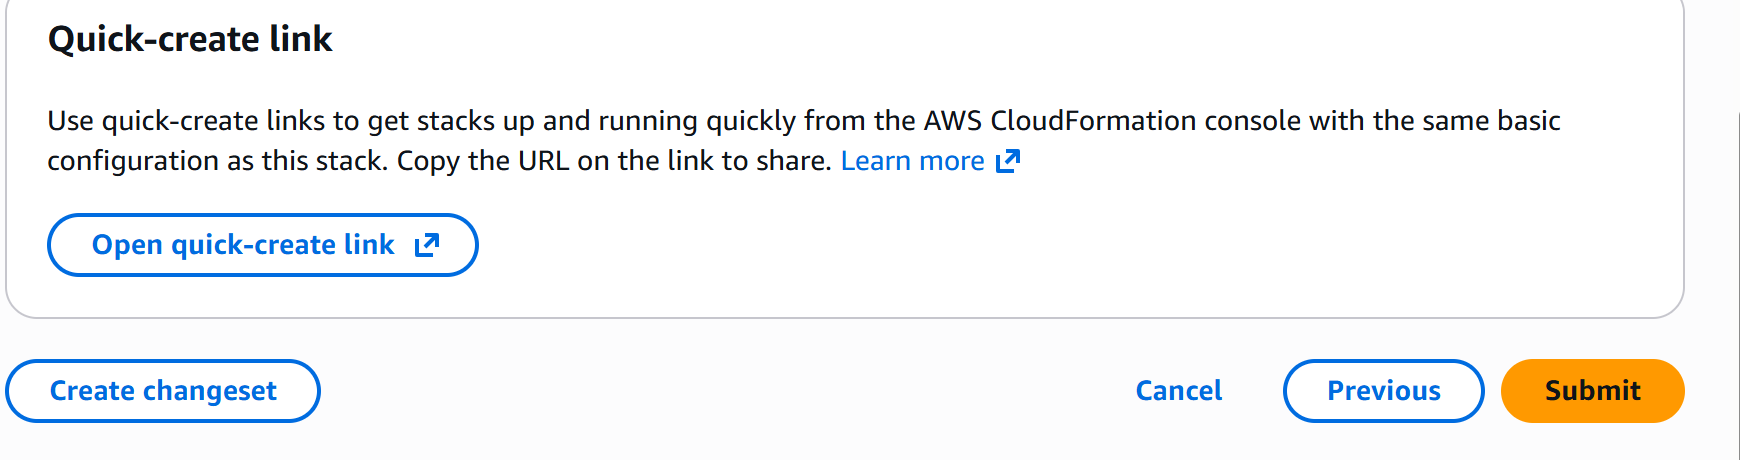
Review the summary, then click Submit:
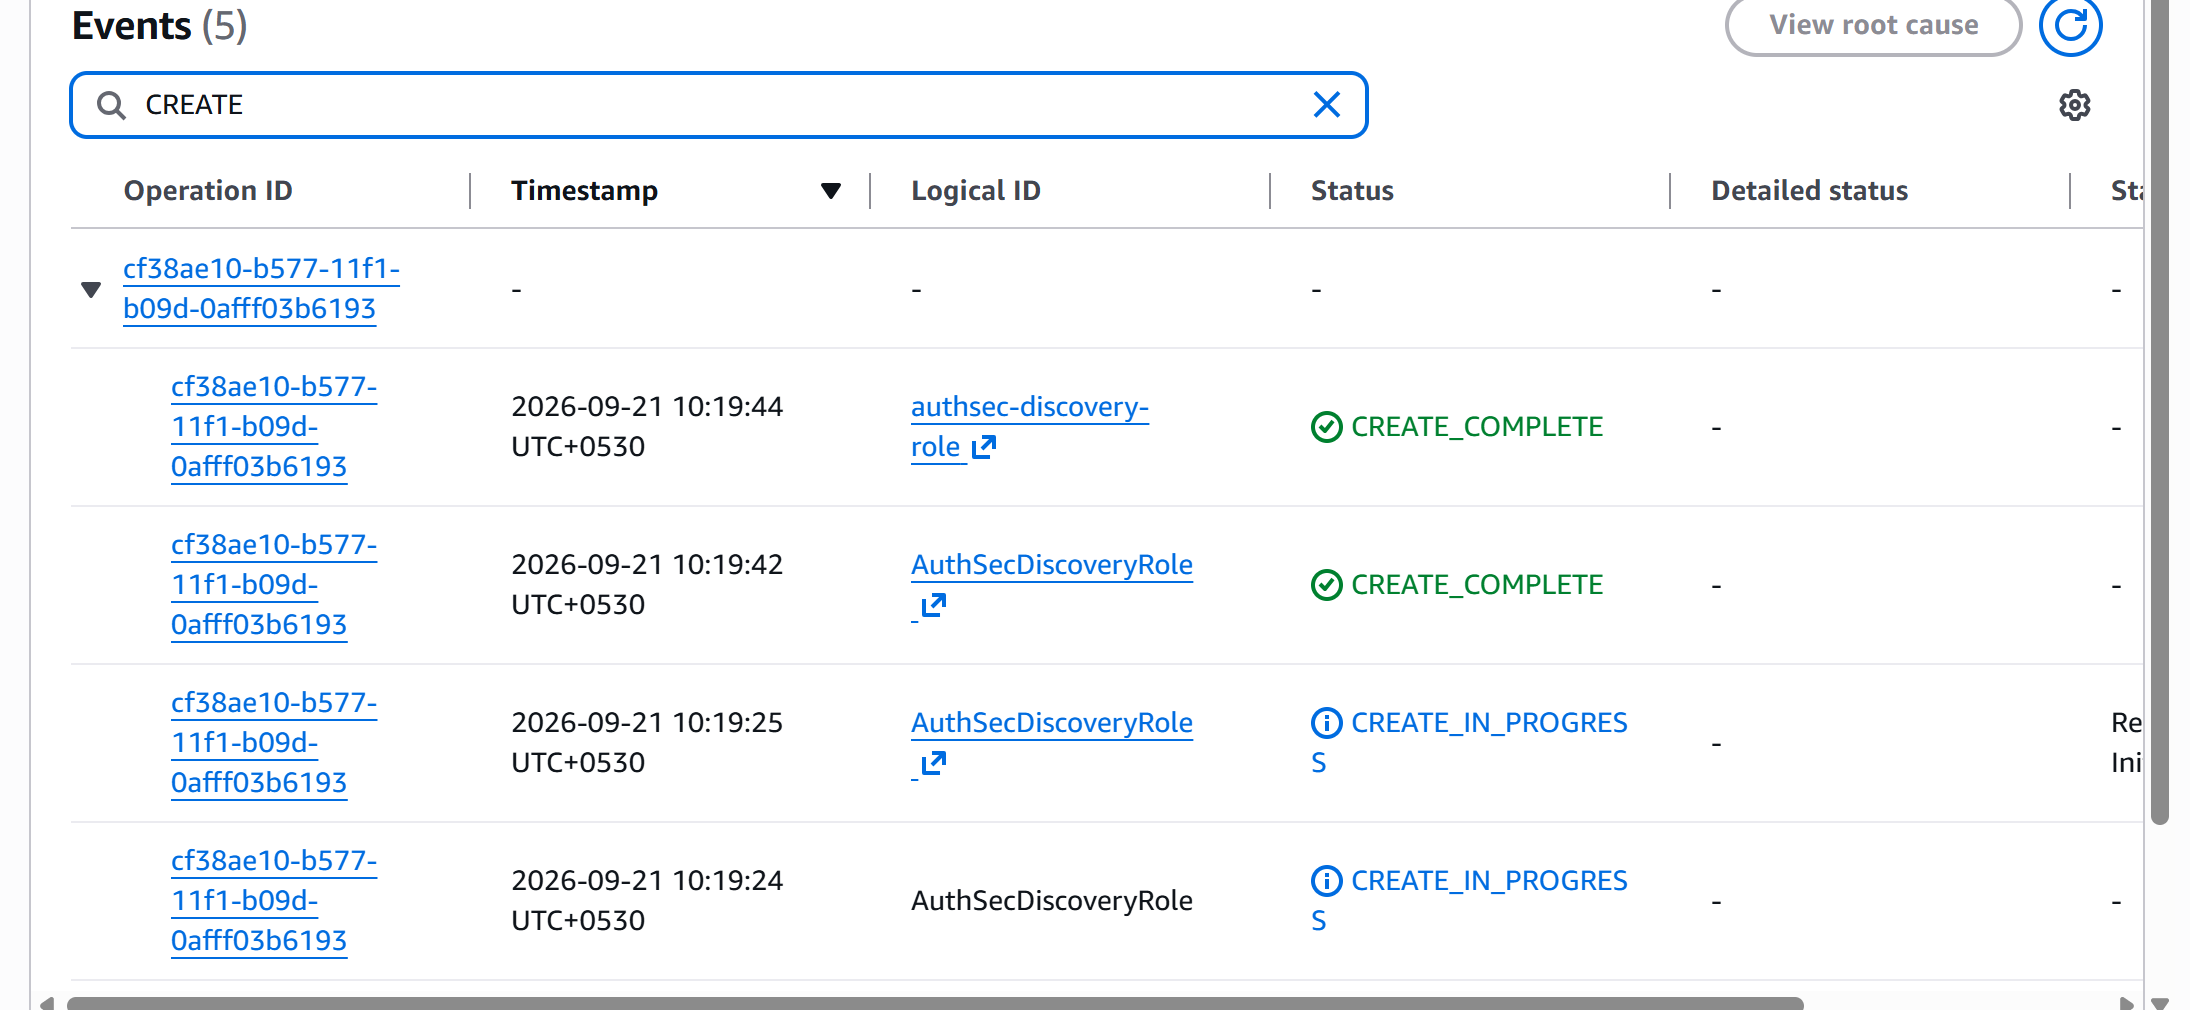
One IAM role creates fast -- usually under a minute. Watch the Events tab
until the role and then the stack reach CREATE_COMPLETE:
Open the Outputs tab and copy RoleArn. An ARN (Amazon Resource Name) is simply the unique address of an AWS resource:
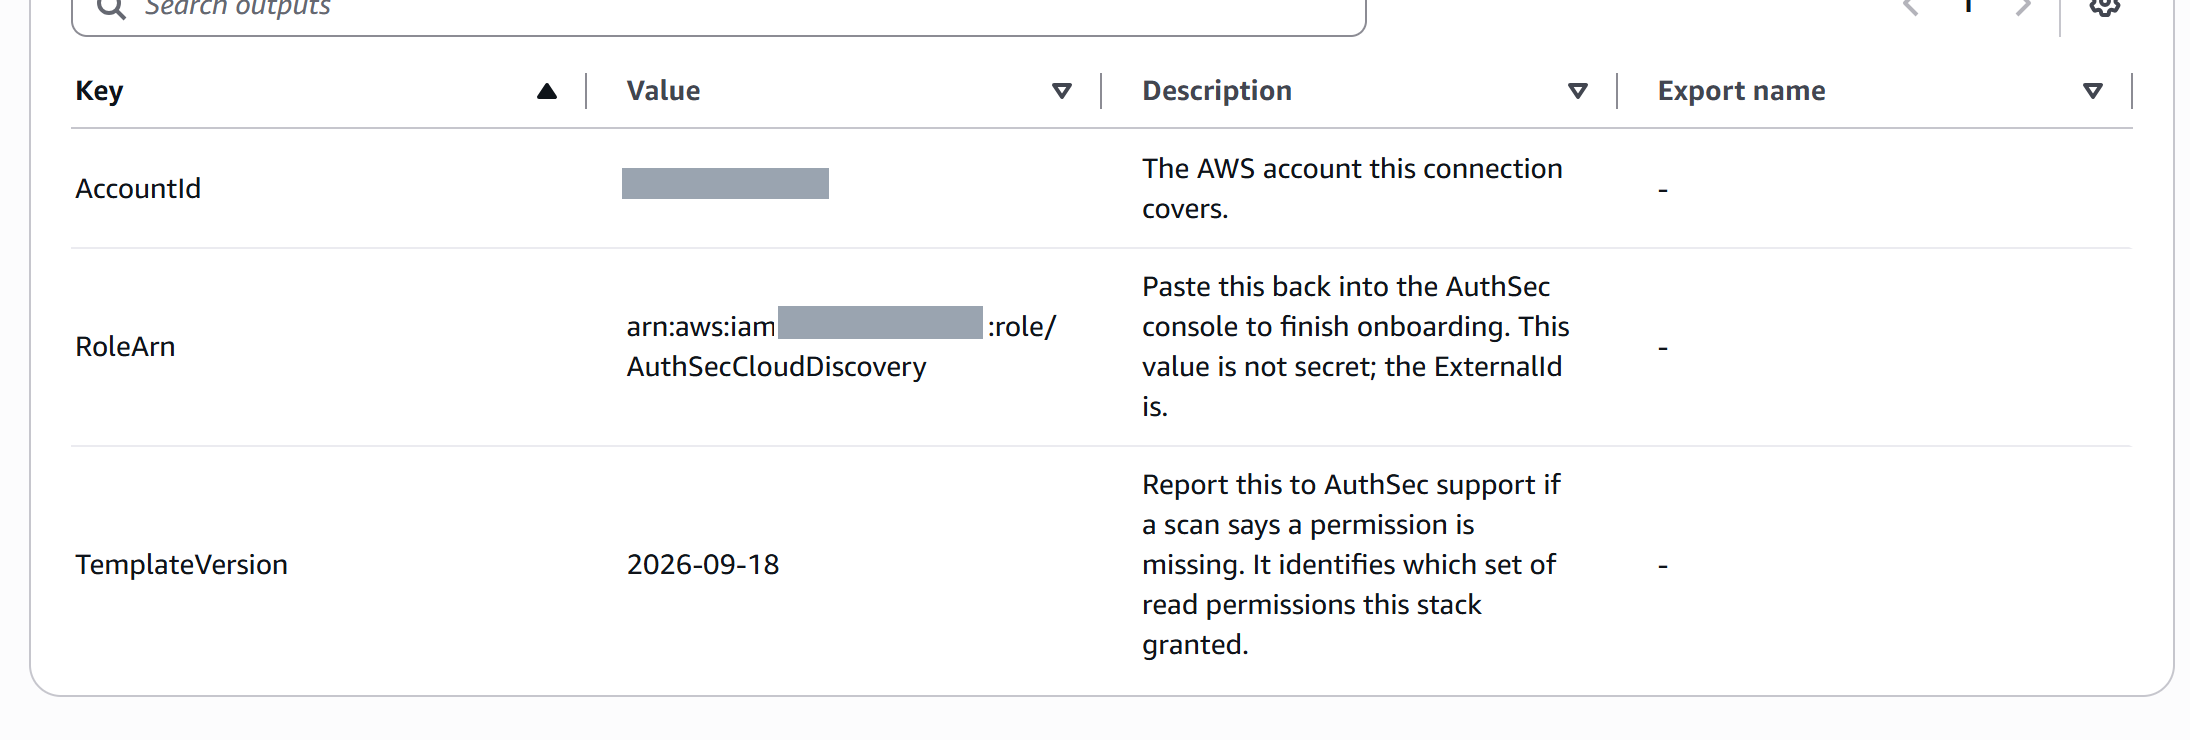
- RoleArn -- what AuthSec needs. It is an address, not a credential: knowing it grants nobody anything, which is precisely why the trust policy pairs it with the ExternalId.
- AccountId -- the account this connection covers
- TemplateVersion -- which set of read permissions this stack granted. Quote it to support if a scan reports a permission it could not use.
Step 3 -- Confirm the role in AuthSec
Back in the wizard, click through to Confirm the role. The ExternalId is carried over from Review & connect unchanged -- you do not retype it. Paste the Role ARN, optionally set a display name, and choose the regions to scan:
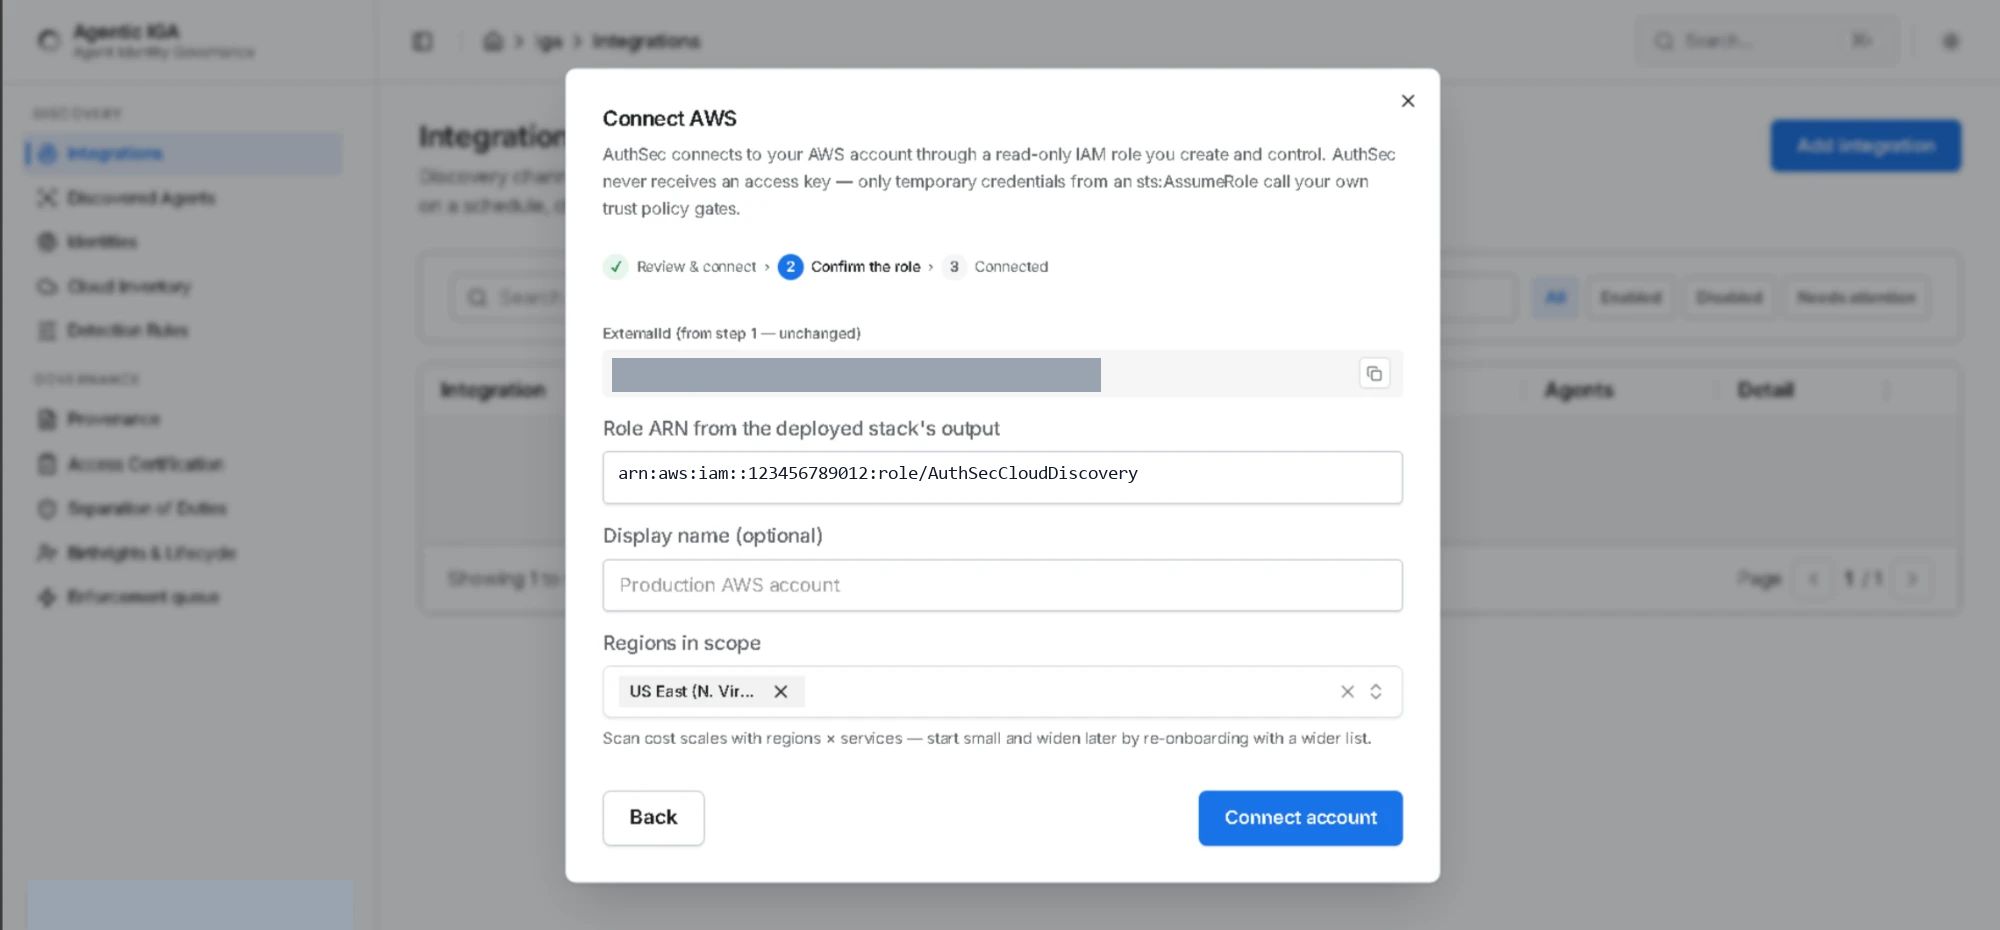
- Role ARN -- the
RoleArnoutput from your stack - Display name -- optional label, e.g.
Production AWS account - Regions in scope -- each region adds another pass over the workload and
agent surfaces, so a long list makes scans take longer. (The reads
themselves are ordinary
Describe/Listcalls and are not billed.) IAM is global, so identities, policies and access keys are collected once regardless of what you pick here -- regions only affect compute, Bedrock, AgentCore, EKS and CloudTrail.
The region list is fixed when the connection is made. To widen it you re-run Add integration for the same account, which issues a new ExternalId and therefore also needs a stack update to match. Start with the regions you actually run workloads in rather than selecting everything defensively.
Click Connect account. AuthSec immediately performs a live
sts:AssumeRole against your new role, presenting the ExternalId it issued.
If AWS accepts, the wizard moves to Connected.
Verify
The integration appears on the Integrations list:
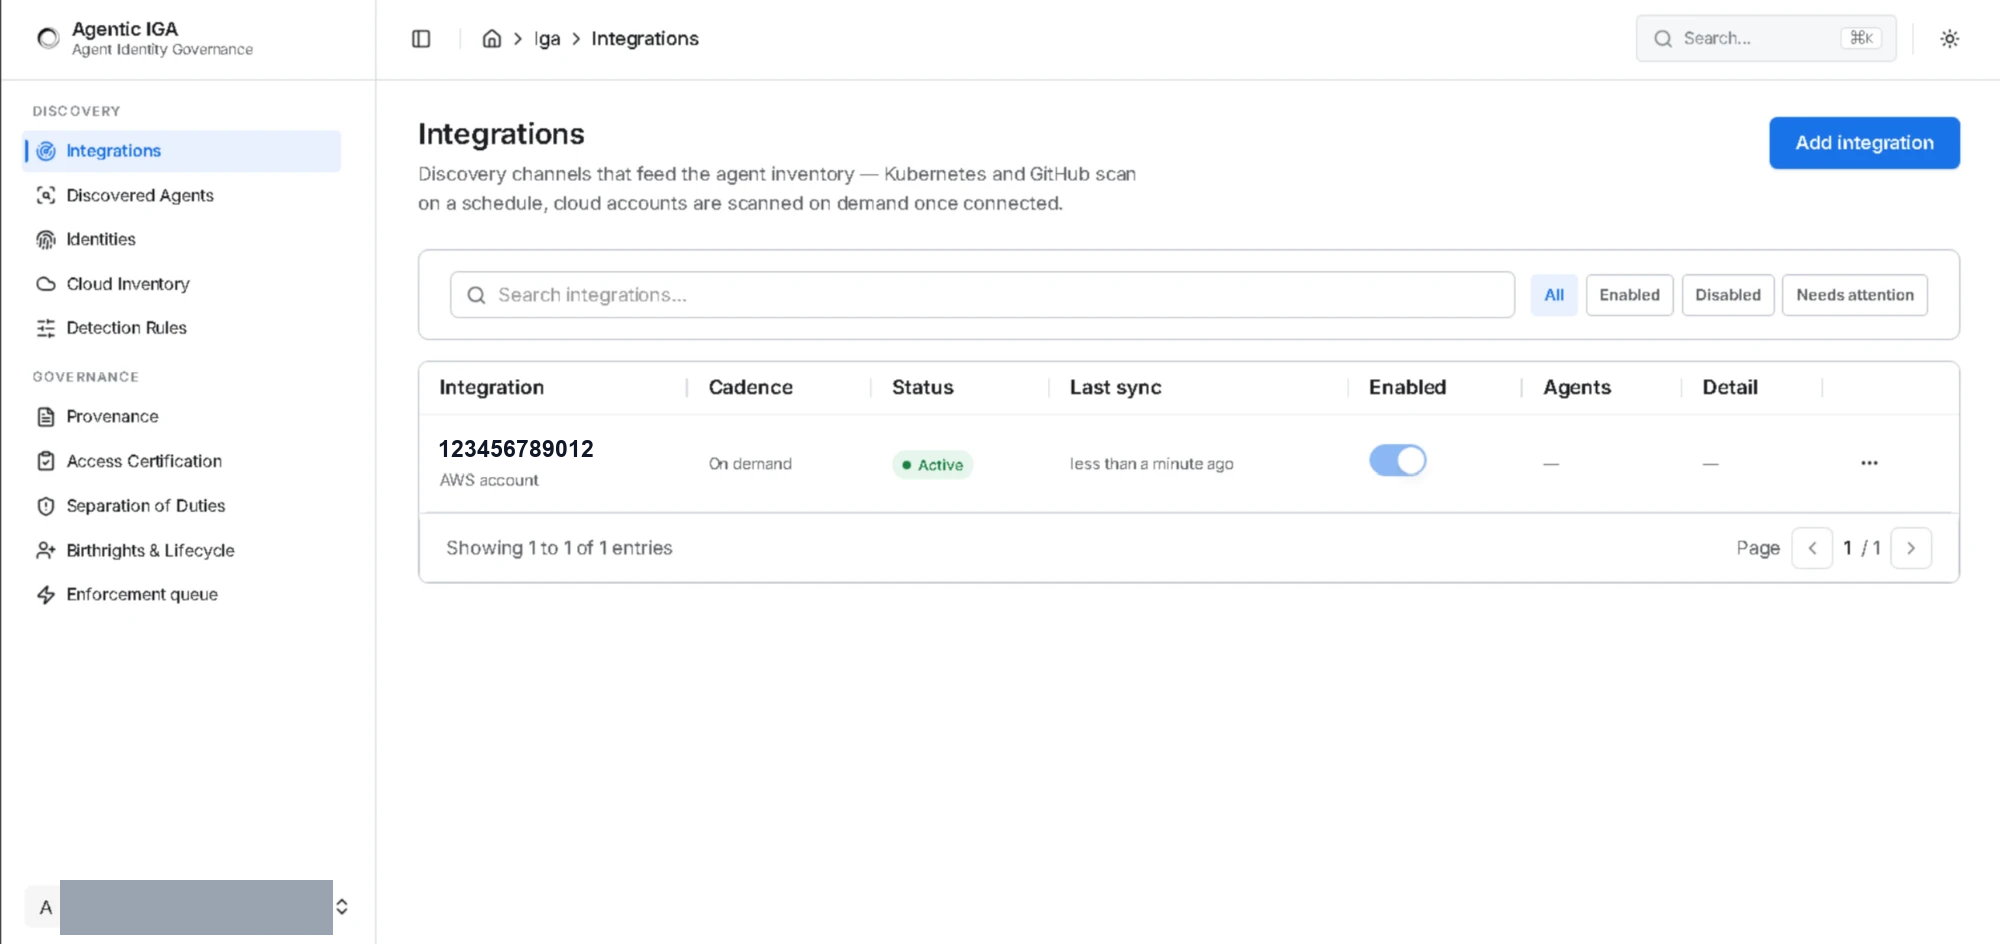
Check three columns:
- Status --
Active - Last sync -- a timestamp from just now
- Cadence --
On demand. Kubernetes and GitHub integrations scan on a schedule; cloud accounts scan when connected and whenever you trigger one.
Then open DISCOVERY -> Cloud Inventory and confirm real resources are listed, and Discovered Agents for anything classified as an agent.
Reading the scan result:
- Some surfaces Reached, others Denied is the common case, and it usually
means the stack predates the permissions those surfaces need. Check the
stack's
TemplateVersionoutput against the template the console currently offers -- see the last row of Troubleshooting. - Every surface Denied cannot happen on a connector that just went Active,
because Connect account performs a live
sts:AssumeRole. If it appears later, something changed in AWS after connecting -- the stack was deleted or updated, the role was edited by hand, or an SCP was applied. Confirm the role still exists and its trust policy still carries the ExternalId.
Revoking
Two independent switches, and either one is enough:
- In AuthSec -- turn the integration's Enabled toggle off to stop scanning while keeping the record and everything already discovered. To remove the connection itself, delete the integration rather than just disabling it.
- In AWS -- CloudFormation -> select the stack -> Delete. This removes the IAM role, which ends AuthSec's ability to assume it within moments; IAM is eventually consistent, so an in-flight scan may finish its current call. The stack created nothing else, so nothing is left behind.
Deleting the stack is the stronger of the two: it revokes access at the AWS end, where you control it, rather than relying on AuthSec to stop asking.
Troubleshooting
| Error | Cause | Fix |
|---|---|---|
"AWS refused the connection" on Connect account, or AccessDenied when AuthSec tests the role | Almost always the ExternalId in your trust policy is not the one this wizard issued -- reopening Add integration generates a fresh one, so a stack deployed from an earlier attempt no longer matches. Two other causes give the same message: the stack has not reached CREATE_COMPLETE, or the Role ARN has a stray leading/trailing space. | Confirm the stack is CREATE_COMPLETE. Then, from the wizard that is currently open, copy its ExternalId and run CloudFormation -> your stack -> Update -> Use existing template, changing only the ExternalId parameter. Come back to that same wizard and finish Confirm the role from it -- starting a new one issues another ExternalId and puts you back where you began. No need to delete the stack. |
Stack fails with ... already exists | A role named AuthSecCloudDiscovery is left over from an earlier attempt | Set a different RoleName, or delete the old role. Check first that nothing else uses it -- if a previous connection is still live, deleting the role breaks it. The IAM console's Last accessed tab on the role will tell you. |
Stack ends in ROLLBACK_COMPLETE | Creation failed and AWS undid it | Open Events and find the first CREATE_FAILED row -- that one carries the real reason; everything after it is cleanup noise |
| A scan reports a permission it could not use | The stack was deployed from an older template | Compare the stack's TemplateVersion output against the template currently offered in the console, and Update with the newer one |
Next
The same inventory can be fed from your clusters and repositories: